Privacy Preserving Machine Learning (PPML) on Azure User Guide
1. Introduction
Protecting privacy and confidentiality is critical for large-scale data analysis and machine learning. BigDL PPML combines various low-level hardware and software security technologies (e.g., Intel® Software Guard Extensions (Intel® SGX), Library Operating System (LibOS) such as Graphene and Occlum, Federated Learning, etc.), so that users can continue to apply standard Big Data and AI technologies (such as Apache Spark, Apache Flink, Tensorflow, PyTorch, etc.) without sacrificing privacy.
BigDL PPML on Azure solution integrate BigDL PPML technology with Azure Services(Azure Kubernetes Service, Azure Storage Account, Azure Key Vault, etc.) to facilitate Azure customer to create Big Data and AI applications while getting high privacy and confidentiality protection.
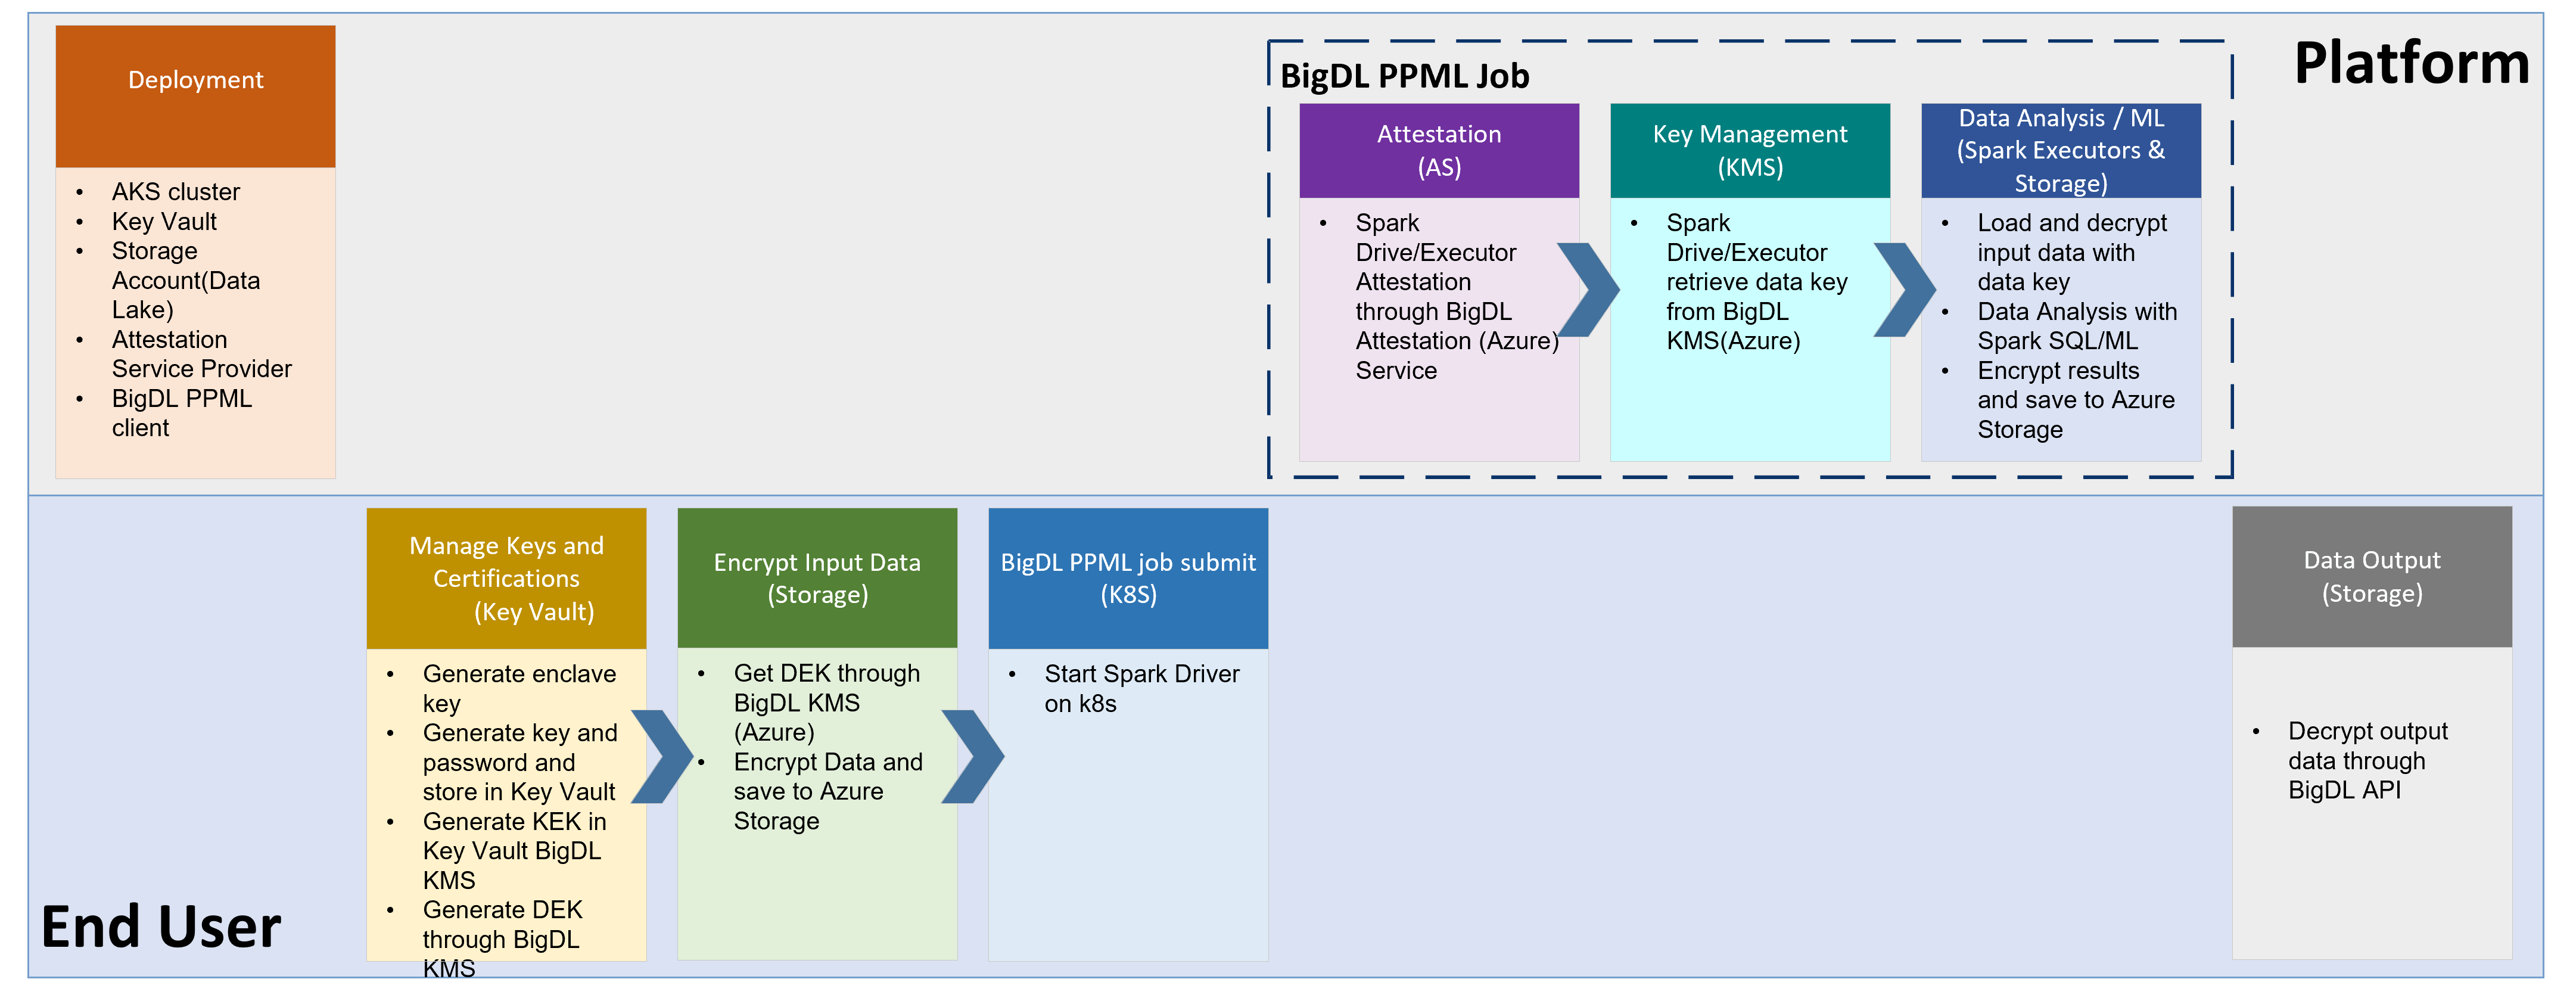
Overall Architecture
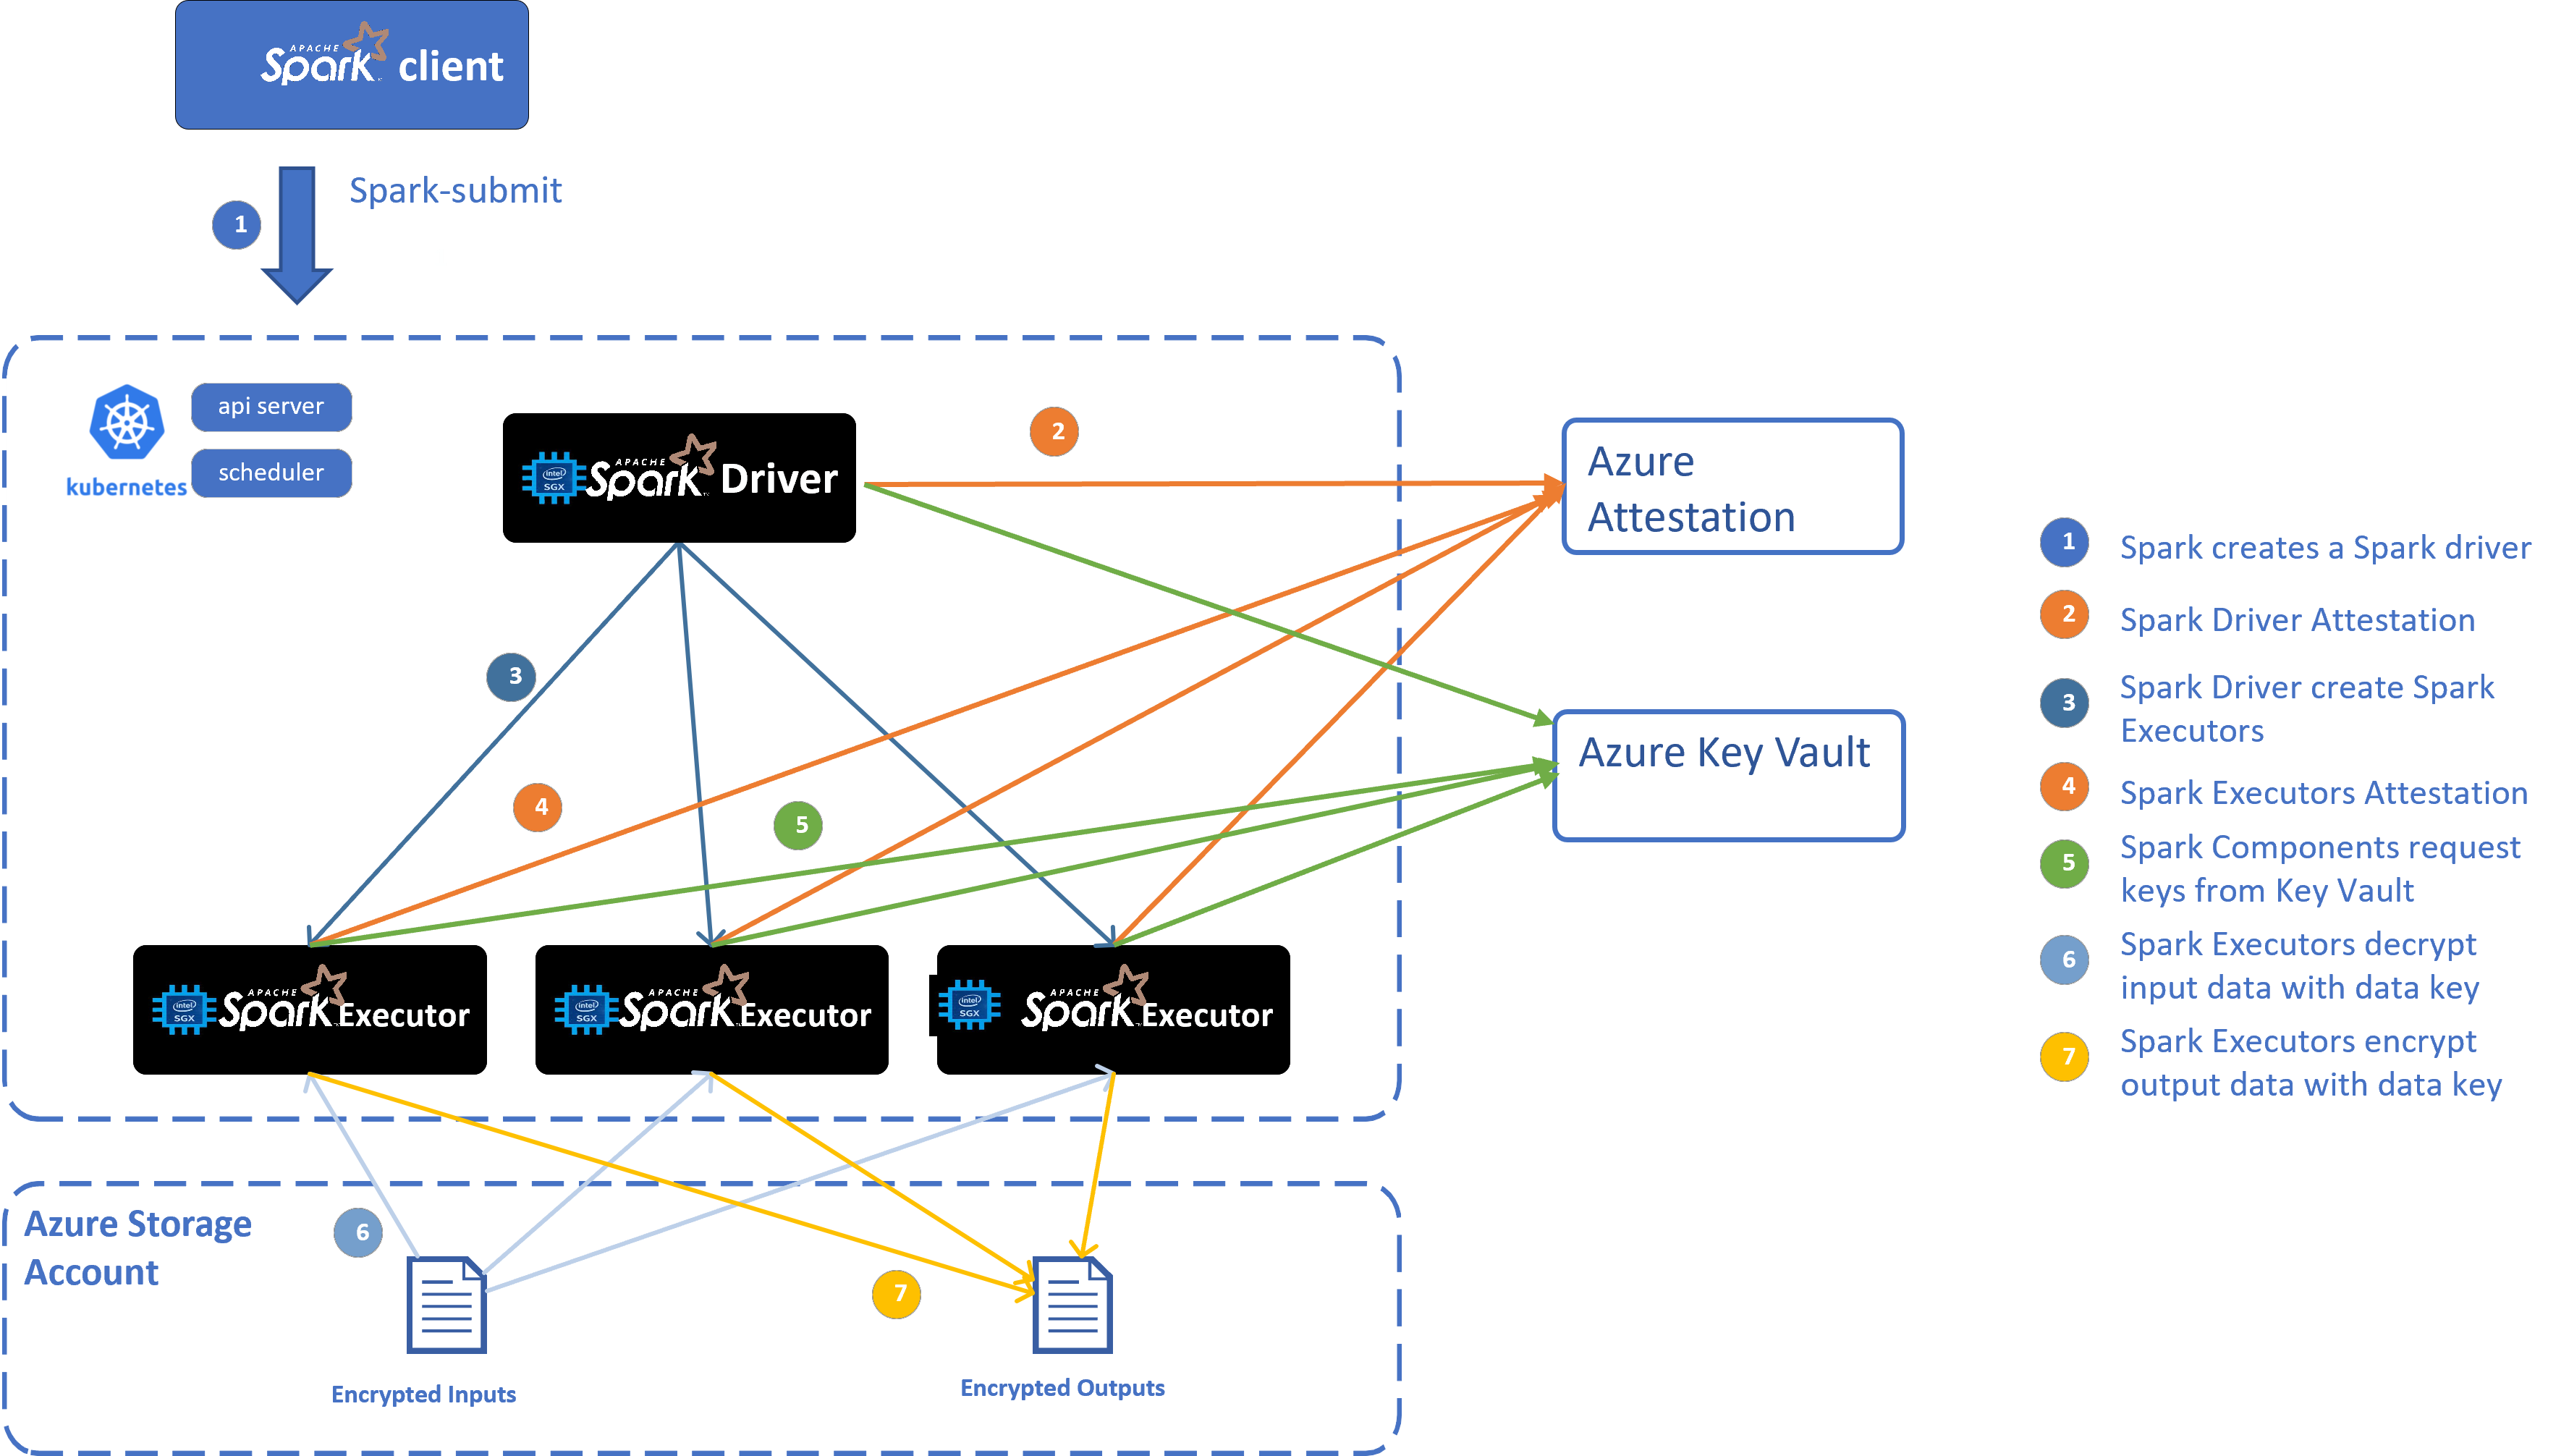
End-to-End Workflow
2. Setup
2.1 Install Azure CLI
Before you setup your environment, please install Azure CLI on your machine according to Azure CLI guide.
Then run az login to login to Azure system before you run the following Azure commands.
2.2 Create Azure VM for hosting BigDL PPML image
2.2.1 Create Resource Group
On your machine, create resource group or use your existing resource group. Example code to create resource group with Azure CLI:
az group create \
    --name myResourceGroup \
    --location myLocation \
    --output none
2.2.2 Create Linux client with SGX support
Create Linux VM through Azure CLI/Portal/Powershell. For size of the VM, please choose DC-V3 Series VM with more than 4 vCPU cores.
2.2.3 Pull BigDL PPML image and run on Linux client
Go to Azure Marketplace, search “BigDL PPML” and find
BigDL PPML: Secure Big Data AI on Intel SGXproduct. Click “Create” button which will lead you toSubscribepage. OnSubscribepage, input your subscription, your Azure container registry, your resource group and your location. Then clickSubscribeto subscribe BigDL PPML to your container registry.Go to your Azure container regsitry, check
Repostirories, and findintel_corporation/bigdl-ppml-trusted-big-data-ml-python-grapheneLogin to the created VM. Then login to your Azure container registry, pull BigDL PPML image using this command:
docker pull myContainerRegistry/intel_corporation/bigdl-ppml-trusted-big-data-ml-python-graphene
Start container of this image
#!/bin/bash

export LOCAL_IP=YOUR_LOCAL_IP
export DOCKER_IMAGE=intelanalytics/bigdl-ppml-trusted-big-data-ml-python-graphene

sudo docker run -itd \
    --privileged \
    --net=host \
    --cpuset-cpus="0-5" \
    --oom-kill-disable \
    --device=/dev/gsgx \
    --device=/dev/sgx/enclave \
    --device=/dev/sgx/provision \
    -v /var/run/aesmd/aesm.socket:/var/run/aesmd/aesm.socket \
    --name=spark-local \
    -e LOCAL_IP=$LOCAL_IP \
    -e SGX_MEM_SIZE=64G \
    $DOCKER_IMAGE bash
2.3 Create AKS(Azure Kubernetes Services) or use existing AKS
Create AKS or use existing AKS with Intel SGX support.
In your BigDL PPML container, you can run /ppml/trusted-big-data-ml/azure/create-aks.sh to create AKS with confidential computing support.
Note: Please use the same VNet information of your client to create AKS. And use DC-Series VM size(i.e.Standard_DC8ds_v3) to create AKS.
/ppml/trusted-big-data-ml/azure/create-aks.sh \
--resource-group myResourceGroup \
--vnet-resource-group myVnetResourceGroup \
--vnet-name myVnetName \
--subnet-name mySubnetName \
--cluster-name myAKSName \
--vm-size myAKSNodeVMSize \
--node-count myAKSInitNodeCount
You can check the information by running:
/ppml/trusted-big-data-ml/azure/create-aks.sh --help
2.4 Create Azure Data Lake Store Gen 2
2.4.1 Create Data Lake Storage account or use an existing one.
The example command to create Data Lake store is as below:
az dls account create --account myDataLakeAccount --location myLocation --resource-group myResourceGroup
Create Container to put user data Example command to create container
az storage fs create -n myFS --account-name myDataLakeAccount --auth-mode login
Create folder, upload file/folder Example command to create folder:
az storage fs directory create -n myDirectory -f myFS --account-name myDataLakeAccount --auth-mode login
Example command to upload file
az storage fs file upload -s "path/to/file" -p myDirectory/file -f myFS --account-name myDataLakeAccount --auth-mode login
Example command to upload directory
az storage fs directory upload -f myFS --account-name myDataLakeAccount -s "path/to/directory" -d myDirectory --recursive
2.4.2 Access data in Hadoop through ABFS(Azure Blob Filesystem) driver
You can access Data Lake Storage in Hadoop filesytem by such URI: abfs[s]://file_system@account_name.dfs.core.windows.net/<path>/<path>/<file_name>
Authentication
The ABFS driver supports two forms of authentication so that the Hadoop application may securely access resources contained within a Data Lake Storage Gen2 capable account.
Shared Key: This permits users to access to ALL resources in the account. The key is encrypted and stored in Hadoop configuration.
Azure Active Directory OAuth Bearer Token: Azure AD bearer tokens are acquired and refreshed by the driver using either the identity of the end user or a configured Service Principal. Using this authentication model, all access is authorized on a per-call basis using the identity associated with the supplied token and evaluated against the assigned POSIX Access Control List (ACL).
By default, in our solution, we use shared key authentication.
Get Access key list of the storage account:
az storage account keys list -g MyResourceGroup -n myDataLakeAccount
Use one of the keys for authentication.
2.5 Create Azure Key Vault
2.5.1 Create or use an existing Azure Key Vault
Example command to create key vault
az keyvault create -n myKeyVault -g myResourceGroup -l location
Take note of the following properties for use in the next section:
The name of the secret object in the key vault
The object type (secret, key, or certificate)
The name of your Azure key vault resource
The Azure tenant ID that the subscription belongs to
2.5.2 Set access policy for the client VM
Run such command to get the system identity:
az vm identity assign -g myResourceGroup -n myVM
The output would be like this:
{
  "systemAssignedIdentity": "ff5505d6-8f72-4b99-af68-baff0fbd20f5",
  "userAssignedIdentities": {}
}
Take note of the systemAssignedIdentity of the client VM.
Set access policy for client VM Example command:
az keyvault set-policy --name myKeyVault --object-id <mySystemAssignedIdentity> --secret-permissions all --key-permissions all --certificate-permissions all
2.5.3 AKS access Key Vault
2.5.3.1 Set access for AKS VM ScaleSet
a. Find your VM ScaleSet in your AKS, and assign system managed identity to VM ScaleSet.
az vm identity assign -g myResourceGroup -n myAKSVMSS
The output would be like below:
principalId: xxxxxxxxx
tenantId: xxxxxxxxxxx
type: SystemAssigned, UserAssigned
userAssignedIdentities:
  ? /subscriptions/xxxx/resourceGroups/xxxxx/providers/Microsoft.ManagedIdentity/userAssignedIdentities/bigdl-ks-agentpool
  : clientId: xxxxxx
    principalId: xxxxx
Take note of principalId of the first line as System Managed Identity of your VMSS.
b. Set access policy for AKS VM ScaleSet
Example command:
az keyvault set-policy --name myKeyVault --object-id <systemManagedIdentityOfVMSS> --secret-permissions get --key-permissions all
2.5.3.2 Set access for AKS
a. Enable Azure Key Vault Provider for Secrets Store CSI Driver support
Example command:
az aks enable-addons --addons azure-keyvault-secrets-provider --name myAKSCluster --resource-group myResourceGroup
Verify the Azure Key Vault Provider for Secrets Store CSI Driver installation Example command:
kubectl get pods -n kube-system -l 'app in (secrets-store-csi-driver, secrets-store-provider-azure)'
Be sure that a Secrets Store CSI Driver pod and an Azure Key Vault Provider pod are running on each node in your cluster’s node pools.
Enable Azure Key Vault Provider for Secrets Store CSI Driver to track of secret update in key vault
az aks update -g myResourceGroup -n myAKSCluster --enable-secret-rotation
b. Provide an identity to access the Azure Key Vault
There are several ways to provide identity for Azure Key Vault Provider for Secrets Store CSI Driver to access Azure Key Vault: An Azure Active Directory pod identity, user-assigned identity or system-assigned managed identity. In our solution, we use user-assigned managed identity.
Enable managed identity in AKS
az aks update -g myResourceGroup -n myAKSCluster --enable-managed-identity
Get user-assigned managed identity that you created when you enabled a managed identity on your AKS cluster Run:
az aks show -g myResourceGroup -n myAKSCluster --query addonProfiles.azureKeyvaultSecretsProvider.identity.clientId -o tsv
The output would be like:
xxxxxxxx-xxxx-xxxx-xxxx-xxxxxxxxxxxx
Take note of this output as your user-assigned managed identity of Azure KeyVault Secrets Provider
Grant your user-assigned managed identity permissions that enable it to read your key vault and view its contents Example command:
az keyvault set-policy -n myKeyVault --key-permissions get --spn xxxxxxxx-xxxx-xxxx-xxxx-xxxxxxxxxxxx
az keyvault set-policy -n myKeyVault --secret-permissions get --spn xxxxxxxx-xxxx-xxxx-xxxx-xxxxxxxxxxxx
c. Create a SecretProviderClass to access your Key Vault
On your client docker container, edit /ppml/trusted-big-data-ml/azure/secretProviderClass.yaml file, modify <client-id> to your user-assigned managed identity of Azure KeyVault Secrets Provider, and modify <key-vault-name> and <tenant-id> to your real key vault name and tenant id.
Then run:
kubectl apply -f /ppml/trusted-big-data-ml/azure/secretProviderClass.yaml
3. Run Spark PPML jobs
Login to your client VM and enter your BigDL PPML container:
docker exec -it spark-local bash
Then run az login to login to Azure system.
3.1 Generate enclave key to Azure Key Vault
Run such script to generate enclave key
/ppml/trusted-big-data-ml/azure/generate-enclave-key-az.sh myKeyVault
3.2 Generate keys
Run such scripts to generate keys:
/ppml/trusted-big-data-ml/azure/generate-keys.sh
When entering the passphrase or password, you could input the same password by yourself; and these passwords could also be used for the next step of generating other passwords. Password should be longer than 6 bits and contain numbers and letters, and one sample password is “3456abcd”. These passwords would be used for future remote attestations and to start SGX enclaves more securely.
3.3 Generate password
Run such script to save the password to Azure Key Vault
/ppml/trusted-big-data-ml/azure/generate-password-az.sh myKeyVault used_password_when_generate_keys
3.4 Save kubeconfig to secret
Login to AKS use such command:
az aks get-credentials --resource-group myResourceGroup --name myAKSCluster
Run such script to save kubeconfig to secret
/ppml/trusted-big-data-ml/azure/kubeconfig-secret.sh
3.5 Create the RBAC
kubectl create serviceaccount spark
kubectl create clusterrolebinding spark-role --clusterrole=edit --serviceaccount=default:spark --namespace=default
3.6 Run PPML spark job
The example script to run PPML spark job on AKS is as below. You can also refer to /ppml/trusted-big-data-ml/azure/submit-spark-sgx-az.sh
SPARK_EXTRA_JAR_PATH=
SPARK_JOB_MAIN_CLASS=
ARGS=
DATA_LAKE_NAME=
DATA_LAKE_ACCESS_KEY=
KEY_VAULT_NAME=
PRIMARY_KEY_PATH=
DATA_KEY_PATH=

LOCAL_IP=
RUNTIME_SPARK_MASTER=

secure_password=`az keyvault secret show --name "key-pass" --vault-name $KEY_VAULT_NAME --query "value" | sed -e 's/^"//' -e 's/"$//'`

export TF_MKL_ALLOC_MAX_BYTES=10737418240 && \
  /opt/jdk8/bin/java \
    -cp '/ppml/trusted-big-data-ml/work/spark-3.1.2/conf/:/ppml/trusted-big-data-ml/work/spark-3.1.2/jars/*' \
    -Xmx12g \
    org.apache.spark.deploy.SparkSubmit \
    --master $RUNTIME_SPARK_MASTER \
    --deploy-mode client \
    --name spark-decrypt-sgx \
    --conf spark.driver.host=$LOCAL_IP
    --conf spark.driver.memory=18g \
    --conf spark.driver.cores=2 \
    --conf spark.executor.cores=2 \
    --conf spark.executor.memory=24g \
    --conf spark.executor.instances=1 \
    --conf spark.driver.defaultJavaOptions="-Dlog4j.configuration=/ppml/trusted-big-data-ml/work/spark-3.1.2/conf/log4j2.xml" \
    --conf spark.executor.defaultJavaOptions="-Dlog4j.configuration=/ppml/trusted-big-data-ml/work/spark-3.1.2/conf/log4j2.xml" \
    --conf spark.kubernetes.authenticate.driver.serviceAccountName=spark \
    --conf spark.kubernetes.container.image=intelanalytics/bigdl-ppml-trusted-big-data-ml-python-graphene:2.1.0-SNAPSHOT \
    --conf spark.kubernetes.driver.podTemplateFile=/ppml/trusted-big-data-ml/azure/spark-driver-template-az.yaml \
    --conf spark.kubernetes.executor.podTemplateFile=/ppml/trusted-big-data-ml/azure/spark-executor-template-az.yaml \
    --conf spark.kubernetes.executor.deleteOnTermination=false \
    --conf spark.network.timeout=10000000 \
    --conf spark.executor.heartbeatInterval=10000000 \
    --conf spark.python.use.daemon=false \
    --conf spark.python.worker.reuse=false \
    --conf spark.sql.auto.repartition=true \
    --conf spark.default.parallelism=400 \
    --conf spark.sql.shuffle.partitions=400 \
    --jars local://$SPARK_EXTRA_JAR_PATH \
    --conf spark.kubernetes.sgx.enabled=true \
    --conf spark.kubernetes.sgx.driver.mem=16g \
    --conf spark.kubernetes.sgx.driver.jvm.mem=7g \
    --conf spark.kubernetes.sgx.executor.mem=16g \
    --conf spark.kubernetes.sgx.executor.jvm.mem=7g \
    --conf spark.kubernetes.sgx.log.level=error \
    --conf spark.authenticate=true \
    --conf spark.authenticate.secret=$secure_password \
    --conf spark.kubernetes.executor.secretKeyRef.SPARK_AUTHENTICATE_SECRET="spark-secret:secret" \
    --conf spark.kubernetes.driver.secretKeyRef.SPARK_AUTHENTICATE_SECRET="spark-secret:secret" \
    --conf spark.authenticate.enableSaslEncryption=true \
    --conf spark.network.crypto.enabled=true \
    --conf spark.network.crypto.keyLength=128 \
    --conf spark.network.crypto.keyFactoryAlgorithm=PBKDF2WithHmacSHA1 \
    --conf spark.io.encryption.enabled=true \
    --conf spark.io.encryption.keySizeBits=128 \
    --conf spark.io.encryption.keygen.algorithm=HmacSHA1 \
    --conf spark.ssl.enabled=true \
    --conf spark.ssl.port=8043 \
    --conf spark.ssl.keyPassword=$secure_password \
    --conf spark.ssl.keyStore=/ppml/trusted-big-data-ml/work/keys/keystore.jks \
    --conf spark.ssl.keyStorePassword=$secure_password \
    --conf spark.ssl.keyStoreType=JKS \
    --conf spark.ssl.trustStore=/ppml/trusted-big-data-ml/work/keys/keystore.jks \
    --conf spark.ssl.trustStorePassword=$secure_password \
    --conf spark.ssl.trustStoreType=JKS \
    --conf spark.hadoop.fs.azure.account.auth.type.${DATA_LAKE_NAME}.dfs.core.windows.net=SharedKey \
    --conf spark.hadoop.fs.azure.account.key.${DATA_LAKE_NAME}.dfs.core.windows.net=${DATA_LAKE_ACCESS_KEY} \
    --conf spark.hadoop.fs.azure.enable.append.support=true \
    --conf spark.bigdl.kms.type=AzureKeyManagementService \
    --conf spark.bigdl.kms.azure.vault=$KEY_VAULT_NAME \
    --conf spark.bigdl.kms.key.primary=$PRIMARY_KEY_PATH \
    --conf spark.bigdl.kms.key.data=$DATA_KEY_PATH \
    --class $SPARK_JOB_MAIN_CLASS \
    --verbose \
    $SPARK_EXTRA_JAR_PATH \
    $ARGS
4. Run TPC-H example
TPC-H queries are implemented using Spark DataFrames API running with BigDL PPML.
4.1 Generating tables
Go to TPC Download site, choose TPC-H source code, then download the TPC-H toolkits.
After you download the TPC-h tools zip and uncompressed the zip file. Go to dbgen directory and create a makefile based on makefile.suite, and run make.
This should generate an executable called dbgen.
./dbgen -h
dbgen gives you various options for generating the tables. The simplest case is running:
./dbgen
which generates tables with extension .tbl with scale 1 (default) for a total of rougly 1GB size across all tables. For different size tables you can use the -s option:
./dbgen -s 10
will generate roughly 10GB of input data.
4.2 Generate primary key and data key
Generate primary key and data key, then save to file system.
The example code for generating the primary key and data key is like below:
java -cp '/ppml/trusted-big-data-ml/work/bigdl-2.1.0-SNAPSHOT/jars/*:/ppml/trusted-big-data-ml/work/spark-3.1.2/conf/:/ppml/trusted-big-data-ml/work/spark-3.1.2/jars/* \
   -Xmx10g \
   com.intel.analytics.bigdl.ppml.examples.GenerateKeys \
   --kmsType AzureKeyManagementService \
   --vaultName xxx \
   --primaryKeyPath xxx/keys/primaryKey \
   --dataKeyPath xxx/keys/dataKey
4.3 Encrypt Data
Encrypt data with specified BigDL AzureKeyManagementService
The example code of encrypting data is like below:
java -cp '/ppml/trusted-big-data-ml/work/bigdl-2.1.0-SNAPSHOT/jars/*:/ppml/trusted-big-data-ml/work/spark-3.1.2/conf/:/ppml/trusted-big-data-ml/work/spark-3.1.2/jars/* \
   -Xmx10g \
   com.intel.analytics.bigdl.ppml.examples.tpch.EncryptFiles \
   --kmsType AzureKeyManagementService \
   --vaultName xxx \
   --primaryKeyPath xxx/keys/primaryKey \
   --dataKeyPath xxx/keys/dataKey \
   --inputPath xxx/dbgen \
   --outputPath xxx/dbgen-encrypted
After encryption, you may upload encrypted data to Azure Data Lake store.
The example script is like below:
az storage fs directory upload -f myFS --account-name myDataLakeAccount -s xxx/dbgen-encrypted -d myDirectory --recursive
4.4 Running
Make sure you set the INPUT_DIR and OUTPUT_DIR in TpchQuery class before compiling to point to the
location of the input data and where the output should be saved.
The example script to run a query is like:
secure_password=`az keyvault secret show --name "key-pass" --vault-name $KEY_VAULT_NAME --query "value" | sed -e 's/^"//' -e 's/"$//'`

DATA_LAKE_NAME=
DATA_LAKE_ACCESS_KEY=
KEY_VAULT_NAME=
PRIMARY_KEY_PATH=
DATA_KEY_PATH=

LOCAL_IP=
RUNTIME_SPARK_MASTER=
INPUT_DIR=xxx/dbgen-encrypted
OUTPUT_DIR=xxx/output

export TF_MKL_ALLOC_MAX_BYTES=10737418240 && \
  /opt/jdk8/bin/java \
    -cp '/ppml/trusted-big-data-ml/work/bigdl-2.1.0-SNAPSHOT/jars/*:/ppml/trusted-big-data-ml/work/spark-3.1.2/conf/:/ppml/trusted-big-data-ml/work/spark-3.1.2/jars/*' \
    -Xmx10g \
    -Dbigdl.mklNumThreads=1 \
    org.apache.spark.deploy.SparkSubmit \
    --master $RUNTIME_SPARK_MASTER \
    --deploy-mode client \
    --name spark-tpch-sgx \
	--conf spark.driver.host=$LOCAL_IP
    --conf spark.driver.memory=18g \
    --conf spark.driver.cores=2 \
    --conf spark.executor.cores=2 \
    --conf spark.executor.memory=24g \
    --conf spark.executor.instances=2 \
    --conf spark.driver.defaultJavaOptions="-Dlog4j.configuration=/ppml/trusted-big-data-ml/work/spark-3.1.2/conf/log4j2.xml" \
    --conf spark.executor.defaultJavaOptions="-Dlog4j.configuration=/ppml/trusted-big-data-ml/work/spark-3.1.2/conf/log4j2.xml" \
    --conf spark.kubernetes.authenticate.driver.serviceAccountName=spark \
    --conf spark.kubernetes.container.image=intelanalytics/bigdl-ppml-trusted-big-data-ml-python-graphene:2.1.0-SNAPSHOT \
    --conf spark.kubernetes.driver.podTemplateFile=/ppml/trusted-big-data-ml/azure/spark-driver-template-az.yaml \
    --conf spark.kubernetes.executor.podTemplateFile=/ppml/trusted-big-data-ml/azure/spark-executor-template-az.yaml \
    --conf spark.kubernetes.executor.deleteOnTermination=false \
    --conf spark.network.timeout=10000000 \
    --conf spark.executor.heartbeatInterval=10000000 \
    --conf spark.python.use.daemon=false \
    --conf spark.python.worker.reuse=false \
    --conf spark.sql.auto.repartition=true \
    --conf spark.default.parallelism=400 \
    --conf spark.sql.shuffle.partitions=400 \
    --jars local://$SPARK_EXTRA_JAR_PATH \
    --conf spark.kubernetes.sgx.enabled=true \
    --conf spark.kubernetes.sgx.driver.mem=16g \
    --conf spark.kubernetes.sgx.driver.jvm.mem=7g \
    --conf spark.kubernetes.sgx.executor.mem=16g \
    --conf spark.kubernetes.sgx.executor.jvm.mem=7g \
    --conf spark.kubernetes.sgx.log.level=error \
    --conf spark.authenticate=true \
    --conf spark.authenticate.secret=$secure_password \
    --conf spark.kubernetes.executor.secretKeyRef.SPARK_AUTHENTICATE_SECRET="spark-secret:secret" \
    --conf spark.kubernetes.driver.secretKeyRef.SPARK_AUTHENTICATE_SECRET="spark-secret:secret" \
    --conf spark.authenticate.enableSaslEncryption=true \
    --conf spark.network.crypto.enabled=true \
    --conf spark.network.crypto.keyLength=128 \
    --conf spark.network.crypto.keyFactoryAlgorithm=PBKDF2WithHmacSHA1 \
    --conf spark.io.encryption.enabled=true \
    --conf spark.io.encryption.keySizeBits=128 \
    --conf spark.io.encryption.keygen.algorithm=HmacSHA1 \
    --conf spark.ssl.enabled=true \
    --conf spark.ssl.port=8043 \
    --conf spark.ssl.keyPassword=$secure_password \
    --conf spark.ssl.keyStore=/ppml/trusted-big-data-ml/work/keys/keystore.jks \
    --conf spark.ssl.keyStorePassword=$secure_password \
    --conf spark.ssl.keyStoreType=JKS \
    --conf spark.ssl.trustStore=/ppml/trusted-big-data-ml/work/keys/keystore.jks \
    --conf spark.ssl.trustStorePassword=$secure_password \
    --conf spark.ssl.trustStoreType=JKS \
    --conf spark.hadoop.fs.azure.account.auth.type.${DATA_LAKE_NAME}.dfs.core.windows.net=SharedKey \
    --conf spark.hadoop.fs.azure.account.key.${DATA_LAKE_NAME}.dfs.core.windows.net=${DATA_LAKE_ACCESS_KEY} \
    --conf spark.hadoop.fs.azure.enable.append.support=true \
    --conf spark.bigdl.kms.type=AzureKeyManagementService \
    --conf spark.bigdl.kms.azure.vault=$KEY_VAULT_NAME \
    --conf spark.bigdl.kms.key.primary=$PRIMARY_KEY_PATH \
    --conf spark.bigdl.kms.key.data=$DATA_KEY_PATH \
    --class $SPARK_JOB_MAIN_CLASS \
    --verbose \
    /ppml/trusted-big-data-ml/work/bigdl-2.1.0-SNAPSHOT/jars/bigdl-ppml-spark_3.1.2-2.1.0-SNAPSHOT.jar \
    $INPUT_DIR $OUTPUT_DIR aes_cbc_pkcs5padding plain_text [QUERY]
INPUT_DIR is the TPC-H’s data dir. OUTPUT_DIR is the dir to write the query result. The optional parameter [QUERY] is the number of the query to run e.g 1, 2, …, 22